Cakewalk // Documentation // SONAR X2 // External Insert plug-in (Producer and Studio only)
Table of Contents Previous Next Index

Mixing ► External Insert plug-in (Producer and Studio only)

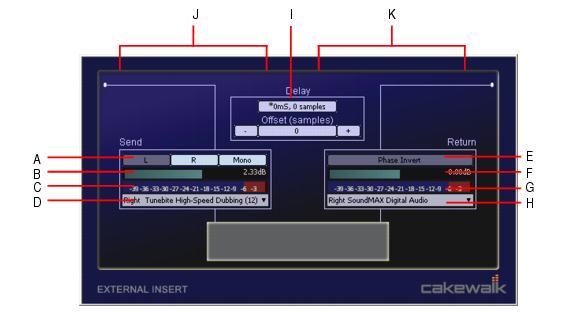
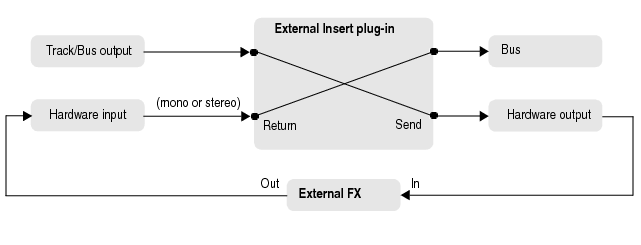
The purpose of the External Insert plug-in is to route audio to and from existing I/O ports in SONAR, allowing an external audio device to be effectively patched into any effects bin. This allows you to seamlessly incorporate your favorite outboard gear in a SONAR project.
The External Insert plug-in is able to measure and automatically compensate for the round-trip delay through your audio hardware (the time it takes for the audio to exit you computer, be processed by your external audio hardware and finally returned to the computer).
list-image
L (Left). This toggle enables/disables the left channel send output (enabled by default).
list-image
R (Right). This toggle enables/disables the right channel send output (enabled by default).
list-image
Mono. This toggle sums the stereo signal to make it dual-mono so the send output has the same audio on the left and right channels.
Send Level. This is a +/- 24dB trim to the level that is passed to the external send. This parameter is automatable.
Send VU Meter. This meter shows the signal level being delivered to the external send. Since this is feeding a sound card output, it is important to avoid clipping at this stage.
Send Port Picker. This control lets you choose an audio output that currently has nothing routed to it. This is the port that you should connect to the input(s) of your external gear. All output ports that are already used in the project are excluded (except for master buses that have other instances of the External Insert plug-in routed to them).
Return Phase Control. This control flips the phase of the signal being returned to the external return input. This parameter is automatable.
Return Level. This is a +/- 24dB trim to the level that is passed from the external send. This parameter is automatable.
Return VU Meter. This meter shows the signal level entering the external return.
Return Port Picker. This control lets you choose any available hardware input. This is the port you that you should connect to the output(s) of your external gear. All input ports that are already used in the project are excluded
Delay Measurement. This control shows the last measured round-trip delay through your audio hardware. Click the control to initiate a new measurement.
Manual Delay Offset. The center control displays and resets the manual delay offset. The buttons to the left decrease the manual offset by 1 or 10 samples. The buttons to the right increase the manual offset by 1 or 10 samples. All delay buttons are disabled during playback.
Note 1: Time-based effects such as reverb and delay can artificially increase the latency measurement. Before manually measuring the delay, you may want to bypass the external gear (if Bypass is supported by your external gear).
Note 2: The delay is automatically re-measured if the Buffer Size setting is changed in Edit > Preferences > Audio - Driver Settings or if ports are changed.
Figure 260. External Insert
A. Send Stereo Mode (Left, Right, Mono) B. Send Level C. Send VU Meter D. Send Port E. Return Phase F. Return Level G. Return VU Meter H. Return Port I. Delay Measurement J. Send section K. Return section
The external gear’s audio input must be connected to one of your audio interface’s output ports and the external gear’s audio output must be connected to one of your audio interface’s input ports.
2.
Right-click an effects bin and select External Insert from the pop-up menu.
3.
Click the Send Port control and choose the audio port that is connected to your external gear’s audio input.
4.
Click the Return Port control and choose the audio port that is connected to your external gear’s audio output.
5.
Click the Delay Measurement control to measure the round-trip delay through your audio hardware.
The round-trip time for the signal to return is measured and displayed on the button. This is the delay that will be compensated for in SONAR to keep the track in sync with the rest of the project. For information about testing the delay measurement, see Testing the delay measurement and When to measure the delay.
Note: Time-based effects such as reverb and delay can artificially increase the latency measurement. Before manually measuring the delay, you may want to bypass the external gear (if Bypass is supported by your external gear).
Tip: The Send and Return levels, Phase and I/O port settings can be saved as a preset. If you frequently use a specific external effect, save the settings as a preset that can be quickly recalled in other projects.
The External Insert plug-in's delay measurement is normally sample accurate. However, for some hardware configurations, it is possible that a manual adjustment of up to several samples may be required in order to be exactly sample-accurate. If you want to test the accuracy of the delay measurement for your hardware, follow these steps:
2.
Use the Track view Tracks > Clone Track(s) command do clone the track (including the audio) to a new track.
4.
Assign the Send and Return to any available input and output on your audio hardware.
6.
Press Play in SONAR.
8.
In the Track Inspector or Console view, click the Phase button on one of the tracks to invert the phase.
9.
In the External Insert plug-in, click the Delay Measurement control to measure the round-trip delay through your audio hardware.
10.
Press Play in SONAR again.
11.
To confirm if the delay is measured as accurately as possible, adjust the manual offset by one sample in either direction. Press Play after each adjustment and note if the sound gets louder or quieter.
In almost all cases, the sound will be quietest with no manual offset. In some rare circumstances, you may have hardware that requires an offset of a sample or two. If this is the case, you will want to always add that offset when you use the External Insert plug-in.
list-image
Changing SONAR's buffer size.
When the current delay setting becomes invalid, an asterisk (*) is displayed next to the delay value. If you notice the asterisk, it means something has changed in your system and it's time to measure the delay again.
When you load a project with the External Insert plug-in (or select a preset in the External Insert interface), SONAR checks to see if the exact same ports are assigned as when the project was saved. SONAR’s port assignments can change if you load the project on a different hardware configuration or change driver models. If there is any discrepancy between the port assignments that were saved and the ports that are used in the current configuration, the ports are set to “None”. Doing so avoids accidentally loading projects and having audio routed in an unexpected way.
The External Insert is a simple way to use real outboard effects as if they are inside SONAR. However there are several good reasons why you should consider bouncing or freezing the audio that passes through the External Insert in order to capture the result of the external hardware processing:
list-image
If you change SONAR’s buffer sizes often, you will need to re-measure the delay on all instances of the External Insert each time.
list-image
If you collaborate with other SONAR users, it will be impossible for other users to get the same sound as you unless they have the exact same outboard gear with exactly the same settings.
When bouncing audio data, SONAR will automatically detect the presence of any External Insert plug-ins (see External Insert plug-in (Producer and Studio only)) in tracks or buses, and disallow the bounce operation if the Fast Bounce mix option is enabled.
list-image
Disable Fast Bounce in the mixdown settings.

Copyright © 2024 Cakewalk, Inc. All rights reserved
Sitemap | Privacy Policy | Legal